Extending Your Network Outdoors:
A Practical Guide
to Running Ethernet Cables Outside
Extending Ethernet beyond the building envelope introduces a new layer of complexity. Moisture, UV exposure, physical abrasion, and electrical interference can all compromise standard cabling.
Whether you’re linking a remote workspace or installing perimeter cameras, outdoor cable runs need to be approached with durability, safety, and signal integrity in mind.
Mapping Out Your Outdoor Ethernet Installation
Before you grab your shovel or ladder, it’s worth putting time into properly planning the path your cable will take. Knowing the length of the run — with a buffer for bends and obstacles — can save you both money and hassle. One of the most common mistakes in outdoor cabling is underestimating how much cable you actually need. A shortfall of even a couple of centimetres can mean a complete do-over.
There are four common ways to route Ethernet cable outside:
Laid directly in the ground
Buried inside protective conduit
Strung between buildings or poles
Secured along the exterior of a structure
Whichever route you choose, getting the measurement right is key. Use a measuring wheel or string line to trace the exact path the cable will follow, including any elevation changes, corners, or structure transitions. Avoid guessing or working off rough distances — outdoor installs leave little room for error.
💡 Pro Tip: The most expensive metre of cable is the one you didn’t include —
because it’s a metre short.
When calculating your total cable length, take into account:
Every bend and turn — Add about 30cm (1 foot) for each, since cable can’t take sharp corners without risking performance
Termination slack — Add at least 60cm (2 feet) at each end for terminations
Termination error buffer — If you're terminating at a patch panel or switch, allow an extra metre to recover from potential mistakes
It's also important not to get carried away with extra slack. While some spare cable can be helpful, adding too much may violate maximum length recommendations (typically 100 metres for Ethernet), or raise eyebrows during a code inspection. Keep slack to a minimum unless absolutely necessary, and always consider how ambient temperature might affect cable performance.
A clear, well-measured cable path sets the foundation for a successful, long-lasting outdoor network — and might just save you from having to dig twice.
Tips for Running Cable Through Conduit
Using conduit is one of the safest and most versatile ways to protect outdoor Ethernet — but it must be done carefully.
Advantages:
Shallower trenches compared to direct burial
Easier future replacements
Light physical protection (PVC) or full shielding (metallic conduit)
Metallic conduit can sometimes eliminate the need for shielded Ethernet entirely
Challenges:
Pulling cable through conduit can damage it if done improperly
Conduit work adds labour and cost
Conduit sizing must be exact — upsizing after installation is nearly impossible
Best Practices:
Use at least ¾" trade size conduit to avoid damage
Keep fill ratio under 40%
Limit runs to 30m (100 feet) per segment with accessible pull points
Avoid more than two 90-degree bends between pull boxes
Use synthetic wax-based lubricant to ease pulls
Rigid conduit (not flexi-tube) protects best
Always pre-load a pull string and keep it in place for future use
Use a pull sock and swivel to prevent twisting and jacket stress
Add protective bushings or sleeves at conduit entry/exit points
Direct Burial Done Right
Some prefer to skip conduit altogether and lay cable straight into the ground. This works — but only with cable that’s rated for it, and only with proper burial technique.
Advantages:
Lower material costs
Cleaner appearance (cable is completely hidden)
Challenges:
More physically demanding install
Less protection from rodents, tools, or heavy vehicles
Best Practices:
Bury between 45–60cm (18–24") deep
Use gel-filled cable to ensure total moisture resistance
Lay down a bedding layer of pea gravel for drainage
Allow slack loops (lazy S-curves) to accommodate soil shift or freeze/thaw cycles
Add one foot of cable length per S-curve when measuring your total run
🐾 Got moles or burrowing pests? Conduit may be a better option.
⚠️ And don’t forget: always call before you dig! Contact utility companies to have underground services marked.
Running Ethernet Overhead Between Structures
Sometimes the most practical route is straight through the air — between buildings, poles, or other fixed points. This method saves you from digging, but brings its own set of safety and technical requirements.
Advantages:
No trenching needed
Quick to install (with the right prep)
Challenges:
Requires climbing and working at height
More vulnerable to lightning and ESD
May not comply with local building codes or HOA rules
Best Practices:
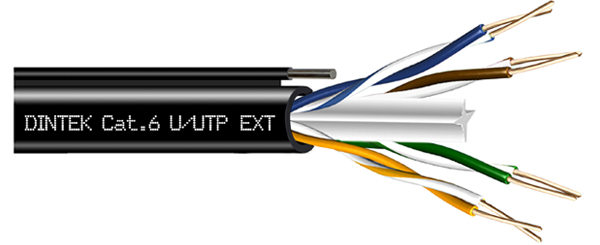
Use shielded cable with an integrated messenger wire
Always ground the cable shield at the equipment end
Install surge protection at both ends
Never use nylon zip ties — they crush the cable. Use UV-stable Velcro straps
Respect code clearance rules, especially over walkways or public spaces
Work in pairs when installing at height, and use fall protection
Only attach cable to structures you own or have permission to access
⚠️ Important: Aerial runs are particularly vulnerable to ESD buildup. Never skip grounding and surge protection!
Single-Building Outdoor Installs
Many home setups involve simply routing Ethernet around the exterior of one building — say, to connect an outdoor camera. This is by far the simplest and safest kind of outdoor install.
Why it's easier:
No ground loop risk
Minimal ESD exposure
No need for shielded cable in most cases
Use screw-in coaxial cable clamps every few metres, and choose a cable colour that blends into your siding. Velcro straps can be used for bundling if running multiple lines.
Just be sure to avoid sharp bends, and don’t over-tighten fasteners, which can deform the jacket and degrade performance over time.
Avoiding Grounding Issues and Lightning Damage in Outdoor Ethernet Installs
Understanding Ground Loops
When shielded Ethernet cable is used to link two different buildings — whether it’s routed underground or above — one major risk is a ground loop. This occurs when each building has a separate electrical ground, and a voltage difference develops between them. If your cable shield is grounded at both ends, it can inadvertently carry electrical current, leading to packet loss, or worse, fried network hardware.
The simplest way to avoid this problem? Use unshielded cable when possible. Unshielded Ethernet eliminates the pathway for current and helps you dodge the whole issue — though there are cases where shielding is still required.
If you do need shielding, ensure it’s grounded properly at one end only (typically the equipment side), and consult with a licensed electrician or structured cabling expert for complex installations.
Protecting Against Lightning and Electrostatic Discharge (ESD)
While lightning might seem like a remote threat, it can do serious damage when it strikes nearby structures, especially if you're using aerial cable or connecting buildings across open ground. Even in-ground cables can conduct voltage from a nearby strike.
Your first step should be to assess your region's lightning risk. If you’re in an area known for summer thunderstorms, ESD mitigation is essential — no matter how you're routing the cable. Even single-building runs that never leave the structure can benefit from surge protection devices as a safeguard.
At a minimum, shielded outdoor Ethernet should always be properly grounded, and surge protectors installed at both ends of any long or vulnerable run.
Moisture Protection: Gel vs. Dry Blocking
When it comes to burying cable, moisture is your biggest enemy. To prevent water from damaging the cable over time, direct burial-rated Ethernet is designed with built-in water-blocking features. These typically come in one of two forms: a petroleum-based gel fill or dry water-blocking tape.
The gel-filled option offers superior resistance to water ingress. The thick, non-water-soluble gel protects the internal wires from long-term exposure to damp soil or groundwater. It’s robust — but messy. Expect sticky hands and tools during termination.
Dry tape, on the other hand, is cleaner to work with and generally results in a slimmer cable, but it doesn’t offer quite the same level of moisture defence. It can still be highly effective, particularly when paired with conduit, but it’s something to weigh against your local soil conditions and the risk of flooding.
Whichever you choose, remember that many direct burial cables are perfectly suitable for above-ground runs too — they’re built to handle UV rays as well as soil moisture.
Balancing Features with Flexibility
The more features a cable has — shielding, thick jackets, water-blocking layers — the more rigid it becomes. This can be a problem if you're installing into tight spaces like weatherproof camera enclosures or compact outdoor access points.
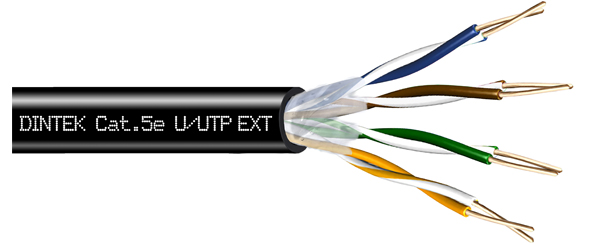
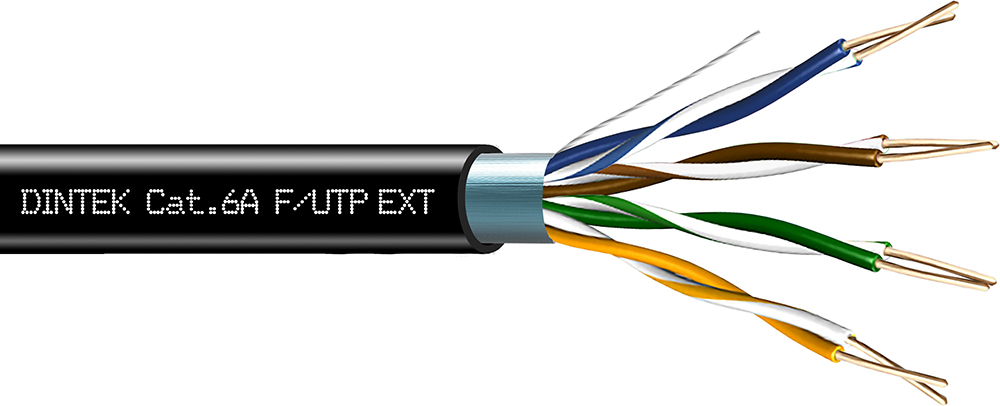
High-spec cables like Cat.6A shielded direct burial may sound ideal on paper, but in practice, you might struggle to route or terminate them cleanly. For many outdoor applications — especially where data speeds of 1 Gbps are sufficient — a Cat.5e outdoor-rated cable may be the smarter choice. It’s slimmer, easier to bend and pull, and still supports PoE and even 2.5 Gbps transmission over short distances.
If shielding isn’t essential in your environment, an unshielded Cat.5e or Cat.6 outdoor cable can be installed far easier and more cost-effectively without compromising on performance for typical home or small business needs.
Choosing the Right Outdoor Ethernet Cable
Once you've mapped your route, know the distance, and considered all of the above, the next crucial decision is selecting the right kind of cable for the environment. This choice depends not just on whether the cable will be buried, run through conduit, or exposed to the elements, but also on the presence of potential electrical interference and your network's speed requirements.
Not all Ethernet cables are created equal — especially when it comes to outdoor conditions. Weather resistance, shielding, ease of installation, and even cable thickness all play a role in whether your installation will be a success or a source of frustration.
What Type of Ethernet Cable Jacket Do You Need Outdoors?
When it comes to Ethernet cabling, safety and durability depend heavily on the cable jacket — and the environment it's used in.
For indoor installations, many cables are still coated in PVC (polyvinyl chloride), which comes in a range of fire safety ratings like CMG, CMR, and CMP. But while those ratings matter inside, they lose relevance outdoors, where UV exposure, moisture, and temperature extremes take over as the main threats. PVC simply isn’t built for that — it degrades, cracks, and compromises your connection.
That’s why DINTEK places a strong focus on LZSH (Low Smoke Zero Halogen) cable across its product range. Not only does LZSH meet stringent indoor fire safety standards, it also avoids the toxic fumes associated with burning PVC, making it a safer and more environmentally responsible choice — especially in confined or public spaces. It's ideal for high-density environments like data centres, schools, hospitals, and commercial buildings where both performance and safety are paramount.
For outdoor applications, Ethernet cables typically use rugged polyethylene jackets — such as LLDPE or HDPE — which stand up to harsh conditions like UV rays and water ingress. These cables may carry a CMX rating and are ideal for aerial runs, external walls, or direct burial — but they aren’t fire-rated for indoor use.
The takeaway? For indoors, LZSH cable is the gold standard — safer, cleaner, and better aligned with today’s safety expectations. For outdoors, go with polyethylene-jacketed cable engineered to endure the elements.
Do You Actually Need Shielding?
Shielded Ethernet cable is designed to protect signal integrity in areas with high electromagnetic interference (EMI). But in most residential or light commercial outdoor installs, it’s not strictly necessary. That said, there are a few scenarios where it absolutely is:
Proximity to electrical wiring: If your Ethernet cable needs to run parallel to power lines (especially over 120V), and closer than about 20cm (8"), shielding is essential to prevent crosstalk or interference.
Near heavy-duty equipment: Running past motors, HVAC units, or transformers? Shielded cable can protect against the strong electromagnetic fields these machines emit.
Aerial installations: Cables suspended outdoors on messenger wires are exposed to wind and static buildup. Shielding can help dissipate electrostatic discharge safely, but only if properly grounded.
High-RFI zones: If you're near a radar station, AM radio tower, or other sources of strong radio frequency interference, shielding might be required — and ideally backed up by a site survey from a qualified contractor.
It’s worth noting that using shielded Ethernet cable unnecessarily can cause more problems than it solves. It’s heavier, harder to bend, and must be grounded correctly to avoid dangerous voltage imbalances or ground loops. Unless you have a clear reason to use it, unshielded cable is often the better — and safer — choice.
⚠️ Heads up: Shielded cable adds bulk and complexity. Use it only when your environment demands it.
When Copper Can’t Cut It: Fiber as the Smarter Option
Outdoor copper cabling (Cat.5e, Cat.6, Cat.6A) is limited not just by distance, but also by temperature. As ambient heat rises, signal loss increases — and in some cases, cable that performs fine in winter may fail in summer heat. If your installation involves rooftop spaces, attics, or long outdoor runs in hot climates, this becomes a real concern.
For Ethernet to stay within spec at high temperatures (over 57°C or 135°F), you’ll often need to shorten the maximum length — sometimes to 75 metres or less. This “de-rating” ensures reliable transmission, but limits your design options.
If you're dealing with very long runs (especially between buildings), or don't need PoE, switching to fiber optic cable is often a more effective solution. It’s immune to EMI, unaffected by temperature swings, and can span hundreds or even thousands of metres with no performance drop.
For example, OM4 multimode fiber can transmit 10Gbps over 400 metres or more with ease, making it ideal for outdoor backbones. And with modern pre-terminated fiber options, installation is often simpler than people expect.

Final Thoughts
Outdoor Ethernet installation can seem intimidating at first — especially with the added risks of water, heat, and electrical interference. But with proper planning, the right materials, and adherence to best practices, you can create a durable, high-performing network that keeps running year after year.